Duplication and diversification: making the dice do less for them and more for youExpert
Duplication means leaving your opponent needing the same numbers for two different jobs, so fewer of their 36 rolls do anything useful. Diversification is the mirror image: spreading your own builders so that as many different numbers as possible work for you. Both are counting exercises, and the counts are below.
The idea in one sentence
Your opponent gets one roll, and one roll can only do so much. If the number that hits your blot is also the number they need to escape, or to cover, or to hit a second blot, then a lot of their good rolls are fighting over the same small set of dice, and the rest of their rolls do nothing. That overlap is duplication, and you create it on purpose by choosing where your checkers stand.
Reading the diagram
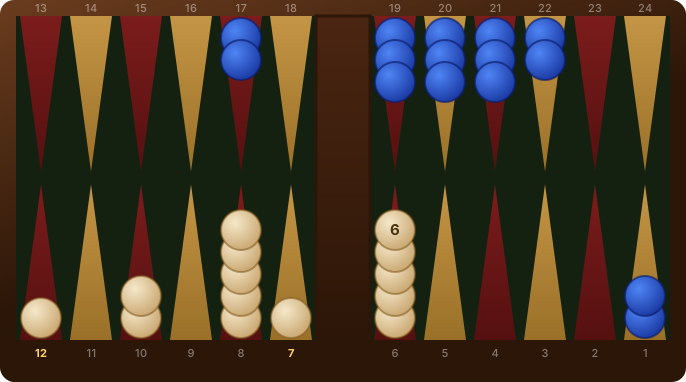
Cream is bringing the last checkers home against a blue anchor on cream's 1-point, and has to leave two blots. They sit on the 7-point and the 12-point, which from the blue checkers are 6 pips and 11 pips away. Blue hits the near blot with any 6 and with the combinations that add up to 6. Blue hits the far blot only with 6-5. But 6-5 contains a 6, so it was already a hitting roll. The second blot adds no new shots at all. It still carries a cost, because 6-5 now hits twice, but the number of rolls that hurt cream is exactly what it would have been with one blot.
Why the same two blots can be cheap or expensive
Move the far blot one point and the picture changes. A blot 7 pips away is hit by 6-1, 5-2 and 4-3, and only 6-1 overlaps with the 6s. A blot 5 pips away is a direct shot with its own set of numbers, and almost nothing overlaps. The table below runs each pairing through all 36 rolls and counts every roll once, so you can see the cost of each placement rather than guess at it. The spread between the best and worst pairing is far larger than most players expect, and it comes entirely from where the second checker stands, not from how many blots there are.
Duplicating against other jobs, not just other blots
The same counting works when the second job is not a hit at all. Suppose your opponent has a checker on the bar and also wants to make a point in their board. If the numbers that enter are the numbers that make the point, you have duplicated them: any roll they use for one, they cannot use for the other. Strong players look for this constantly in holding games, where the defender needs specific numbers to escape a back checker and the attacker arranges blots so that the escaping numbers and the hitting numbers coincide. You cannot compute every case at the board, but you can ask one question: which numbers does my opponent want, and can I make them want the same ones twice?
Diversification: the same arithmetic pointed at yourself
Turn it around and you get the rule for your own builders. You have slotted your 5-point and want to cover it next turn. A builder 3 pips away covers with any roll that reaches 3. Two builders both 3 pips away cover with exactly the same rolls, so the second one adds nothing to your chances; it is duplicated against yourself. Put the second builder 1 pip away instead and every roll containing a 1 joins the list. The table shows the jump. This is why good players spread builders across the outfield rather than stacking them, and why a position with checkers on the 6, 8, 9 and 10 points plays so much better than one with the same checkers piled on the 8.
When duplication is the wrong goal
Duplication is a tool for reducing risk, and it has a price. Arranging blots so that the same numbers hit both often means putting a checker somewhere it does no useful work, and a position full of well-duplicated blots that build nothing is still a bad position. The counts tell you the risk side precisely. They do not tell you the reward side, which is positional and is exactly the kind of judgment a computer review is good at checking. Treat the table as the first half of the decision, never the whole of it.
How to use this at the board
Before you leave a blot, name the numbers that hit it. Before you leave a second, check whether its numbers are mostly the same ones. If they are, the second blot is cheap. If they are completely different, you have roughly doubled the risk and should want a real reason. Then do the same for your builders, in reverse: count how many different numbers bring a checker to the point you want. A few seconds of this, every time, is worth more than memorising any single position.
The numbers, computed
Every figure below is enumerated over all 36 ordered outcomes of two dice, not quoted from a table. Shot counts assume the intervening points are open.
| Situation | Rolls that work | Chance |
|---|---|---|
| Hitting a blot 6 pips away | 17 of 36 | 47.2% |
| Reaching a point 6 or 11 pips away | 17 of 36 | 47.2% |
| Reaching a point 6 or 12 pips away | 18 of 36 | 50.0% |
| Reaching a point 6 or 7 pips away | 21 of 36 | 58.3% |
| Reaching a point 6 or 5 pips away | 28 of 36 | 77.8% |
| Reaching a point 3 pips away | 14 of 36 | 38.9% |
| Reaching a point 1 or 3 pips away | 20 of 36 | 55.6% |
| Reaching a point 2 or 4 pips away | 23 of 36 | 63.9% |
Hitting a blot 6 pips away: Direct shot: a single die reaches it.
Reaching a point 6 or 11 pips away: on their own the distances take 17 and 2 rolls, but 2 of those rolls reach both, so together they come to 17, not 19.
Reaching a point 6 or 12 pips away: on their own the distances take 17 and 3 rolls, but 2 of those rolls reach both, so together they come to 18, not 20.
Reaching a point 6 or 7 pips away: on their own the distances take 17 and 6 rolls, but 2 of those rolls reach both, so together they come to 21, not 23.
Reaching a point 6 or 5 pips away: on their own the distances take 17 and 15 rolls, but 4 of those rolls reach both, so together they come to 28, not 32.
Reaching a point 3 pips away: the baseline, one distance on its own.
Reaching a point 1 or 3 pips away: on their own the distances take 11 and 14 rolls, but 5 of those rolls reach both, so together they come to 20, not 25.
Reaching a point 2 or 4 pips away: on their own the distances take 12 and 15 rolls, but 4 of those rolls reach both, so together they come to 23, not 27.
What most players get wrong
Two blots are twice as dangerous as one.
Only when they are hit by different numbers. Two blots that share their hitting numbers can cost no more shots than one, and in the diagram above the second blot adds none. Players who count blots instead of counting the rolls that hit them routinely make safe-looking plays that leave more shots, not fewer.
Play a rated game and every decision gets reviewed afterwards against the best move available. The dice are committed before you roll and checkable after, so the number you end up with is a measure of you, not of luck.
Play a rated game freeFrequently asked questions
What is duplication in backgammon?
Placing your checkers so that the numbers your opponent needs for one purpose, such as hitting a blot, are the same numbers they need for another, such as hitting a second blot or escaping a back checker. A single roll can only be used once, so overlapping needs reduce how many of their rolls are useful.
What is diversification in backgammon?
Spreading your own builders so that each one covers a target with different numbers. Two builders at the same distance from a point add no new covering rolls; two at different distances add every roll that reaches the second distance.
Is it ever right to leave two blots instead of one?
Often. If both blots are hit by the same numbers, the second one can add few or no extra shots, while the play that leaves it may build a point or bring a checker home. Count the rolls that hit, not the number of blots.
Do shot counts account for blocked points?
The table assumes the intervening points are open, which is the standard convention. A made point in the path can only remove combination shots, never add them, so on a real board the counts are an upper bound. In the diagrammed position every path is open and the counts are exact.
© 2026 Backgammon Battles